Digdag + embulk + BigQuery + Re:dash でデータ分析基盤構築の夢を見る
Digdag が Apache License 2.0 の元でオープンソース化されましたよ! さぁ試すんだ…! 今すぐにでも! https://t.co/Uzc4a5GLCe ドキュメント:https://t.co/PF8wy5KHln
— Sadayuki Furuhashi (@frsyuki) 2016年6月15日
Digdagが先日リリースされたのをきっかけにデータ分析基盤構築の夢を見た。
今回は、Google Cloud Platform(以下、GCP)のコストを可視化かつ分析可能にしてみて、まずはDigdagの使用感を試してみることにする。
事前知識
Digdagとは
Workload Automation Systemである。以下の記事が詳しい。
事前準備
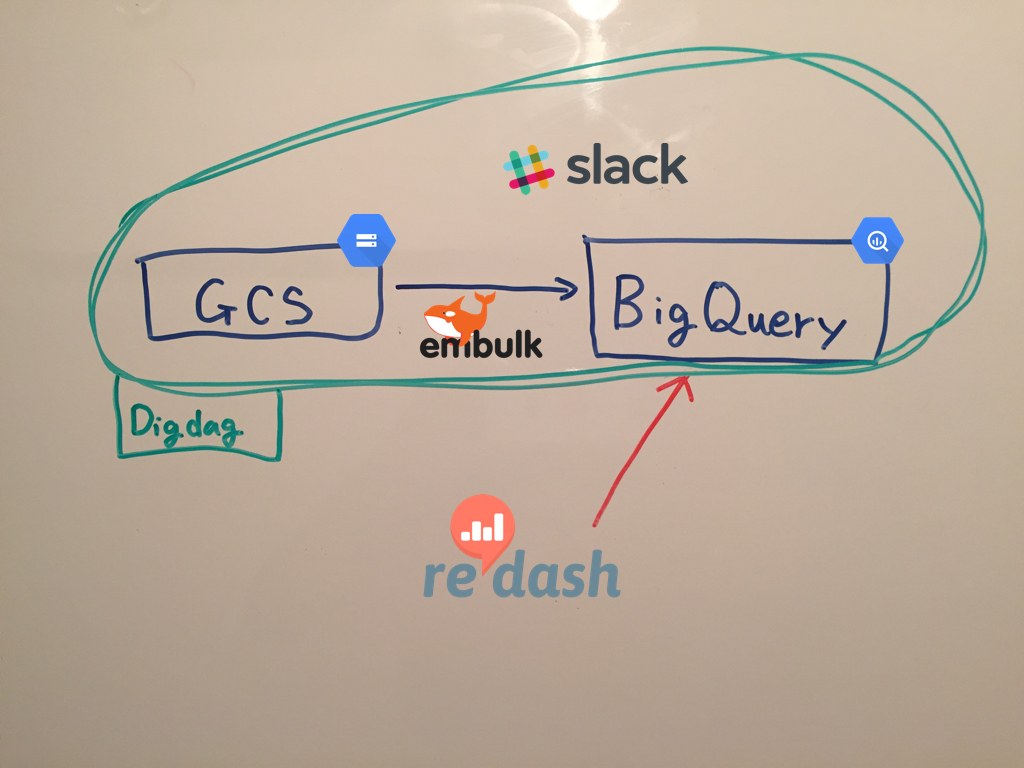
以下の記事を参考に、GCPのExport billing dataを有効にし、dailyでGCPの使用量や料金を指定したGoogle Cloud Storage(以下、GCS)のbucketに吐き出されるようにする。
イメージ図

構築手順
embulkについて
事前準備によって吐き出されたCSVを、GCSからBigQueryにロードする。
embulkの設定ファイルはこんな感じ。
# in_gcs_out_bigquery.yml.liquid

in:
  type: gcs
  bucket: billing-bucket
  path_prefix: billing-
  auth_method: json_key
  service_account_email: {{ env.GCP_SERVICE_ACCOUNT_EMAIL }}
  json_keyfile: {{ env.GCP_JSON_KEY_PATH }}
  parser:
    charset: UTF-8
    newline: CRLF
    type: csv
    delimiter: ','
    quote: '"'
    escape: '"'
    trim_if_not_quoted: false
    skip_header_lines: 1
    allow_extra_columns: true
    allow_optional_columns: true
    columns:
    - {name: Account_ID, type: string}
    - {name: Line_Item, type: string}
    - {name: Start_Time, type: timestamp, format: '%Y-%m-%dT%H:%M:%S%:z'}
    - {name: End_Time, type: timestamp, format: '%Y-%m-%dT%H:%M:%S%:z'}
    - {name: Project, type: long}
    - {name: Measurement1, type: string}
    - {name: Measurement1_Total_Consumption, type: long}
    - {name: Measurement1_Units, type: string}
    - {name: Cost, type: string}
    - {name: Currency, type: string}
    - {name: Project_Number, type: long}
    - {name: Project_ID, type: string}
    - {name: Project_Name, type: string}
    - {name: Project_Labels, type: string}
    - {name: Description, type: string}
out:
  type: bigquery
  mode: append
  auth_method: json_key
  service_account_email: {{ env.GCP_SERVICE_ACCOUNT_EMAIL }}
  json_keyfile: {{ env.GCP_JSON_KEY_PATH }}
  project: yukiyan-development
  dataset: gcp_billing
  table: billing_%Y_%m_%d
  auto_create_dataset: true
  auto_create_table: true
in:のparser:句は、手で書くと辛いのでembulk guessを使うと良い。
in:
  type: gcs
  bucket: billing-bucket
  path_prefix: billing-
  auth_method: json_key
  service_account_email: {{ env.GCP_SERVICE_ACCOUNT_EMAIL }}
  json_keyfile: {{ env.GCP_JSON_KEY_PATH }}
ここまで書いて、embulk guess in_gcs_out_bigquery.yml.liquidを実行するとparser:句をguessしてくれる(すごい便利)。
% embulk guess data/in_gcs_out_bigquery.yml.liquid
...(省略)...
  parser:
    charset: UTF-8
    newline: CRLF
    type: csv
    delimiter: ','
    quote: '"'
    escape: '"'
    trim_if_not_quoted: false
    skip_header_lines: 1
    allow_extra_columns: false
    allow_optional_columns: false
    columns:
    - {name: Account ID, type: string}
    - {name: Line Item, type: string}
    - {name: Start Time, type: timestamp, format: '%Y-%m-%dT%H:%M:%S%:z'}
    - {name: End Time, type: timestamp, format: '%Y-%m-%dT%H:%M:%S%:z'}
    - {name: Project, type: long}
    - {name: Measurement1, type: string}
    - {name: Measurement1 Total Consumption, type: long}
    - {name: Measurement1 Units, type: string}
    - {name: Cost, type: string}
    - {name: Currency, type: string}
    - {name: Project Number, type: long}
    - {name: Project ID, type: string}
    - {name: Project Name, type: string}
    - {name: Project Labels, type: string}
    - {name: Description, type: string}
Use -o PATH option to write the guessed config file to a file.
guessはあくまでguessなので、細かい部分は手で修正する。
事前準備によって吐き出されるCSVのスキーマが不安定なので、allow_extra_columnsとallow_optional_columnsをtrueにする。
allow_extra_columns
If true, ignore too many columns. Otherwise, skip the row in case of too many columnsallow_optional_columns
If true, set null to insufficient columns. Otherwise, skip the row in case of insufficient number of columns
Configuration — Embulk 0.8 documentation
あと、BigQueryのテーブルのカラムにはスペースを入れられないのでAccount IDなどをAccount_IDのようにする。
You can embed environment variables in configuration file using Liquid template engine (This is experimental feature. Behavior might change or be removed in future releases).
Configuration — Embulk 0.8 documentation
ちなみに、embulkはテンプレートエンジンにLiquidを採用しているので、{{ env.HOGEFUGA }} と書くことで環境変数を埋め込める。
今回は、embulkのプラグインとして、embulk/embulk-input-gcsとembulk/embulk-output-bigqueryを使った。
特にembulk-output-bigqueryはオプションが豊富なのでとてもありがたい。
Digdagについて
前述のembulkの設定さえしておけば、embulk run in_gcs_out_bigquery.yml.liquidでBigQueryにデータを投入できるのだが、あとからもっと処理を追加したくなったときのためにDigdagを使ってみる。
Digdagの環境構築
以下の記事を参考にする。
java8でも古いと怒られる 😂
% digdag run billing_workflow.dig
2016-06-20 01:43:03 +0900: Digdag v0.8.1
error: Found too old java version (1.8.0_31). Please use at least JDK 8u71 (1.8.0_71).
バージョンの切り替えはjenvが楽だった。
% jenv versions
  system
  1.8
* 1.8.0.31 (set by /Users/yukiyan/.jenv/version)
  1.8.0.92
  oracle64-1.8.0.31
  oracle64-1.8.0.92
😀  [yukiyan ♟  ~/work/zatsu/billing_workflow ]
% jenv global 1.8.0.92
😀  [yukiyan ♟  ~/work/zatsu/billing_workflow ]
% jenv versions
  system
  1.8
  1.8.0.31
* 1.8.0.92 (set by /Users/yukiyan/.jenv/version)
  oracle64-1.8.0.31
  oracle64-1.8.0.92
😀  [yukiyan ♟  ~/work/zatsu/billing_workflow ]
% java -version
java version "1.8.0_92"
Java(TM) SE Runtime Environment (build 1.8.0_92-b14)
Java HotSpot(TM) 64-Bit Server VM (build 25.92-b14, mixed mode)
Digdagの設定
最終的なディレクトリ構成はこんな感じ。
% tree -a .
.
├── .credentials
│   └── yukiyan-development-xxxxxxx.json
├── .gitignore
├── billing_workflow.dig
├── data
│   └── in_gcs_out_bigquery.yml.liquid
└── tasks
    └── my_notification.rb
data/in_gcs_out_bigquery.yml.liquidは、先ほど作成したもの。
以下のように、billing_workflow.digにDigdagの設定を書いていく。
timezone: Asia/Tokyo

+load:
  embulk>: data/in_gcs_out_bigquery.yml.liquid

+last:
  rb>: MyNotification.notify
  require: tasks/my_notification.rb
Rubyで簡単なスクリプトを書いて、最後にslack通知されるようにしている。取り急ぎ、stevenosloan/slack-notifierというgemを使った。
# tasks/my_notification.rb

require 'slack-notifier'

class MyNotification
  def notify
    notifier = Slack::Notifier.new "xxxxxx", channel: '#yukiyan-devel', username: 'digdag'
    notifier.ping "ジョブが終わったよ", icon_emoji: ":smile:"
  end
end
Digdagの解説
“+” is a task
Key names starting with + sign is a task. Tasks run from the top to bottom in order. A task can be nested as a child of another task. In above example, +step2 runs after +step1 as a child of +main task.
Workflow definition — Digdag 0.8 documentation
実行したいタスクは+を付けてグルーピングしておけば上から実行される。+に付ける名前はわかりやすい任意の名前で良い。+yukiyan_load:でも動いた。
operators>
A task with type>: command or _type: NAME parameter executes an action. You can choose various kinds of operators such as running shell scripts, Python methods, sending email, etc. See Operators page for the list of built-in operators.
Workflow definition — Digdag 0.8 documentation
Operatorsを使って、embulk>やrb>のように書いて、なにを実行したいか記述していく。
Operatorsは豊富で、Ruby・Python・Shell scriptを実行できたり、if>で条件分岐したりfail>でエラーハンドリングもできる。
先ほどのbilling_workflow.digは、最初に+load:句でembulkを実行して、次に+last:句でslack通知を行う。以下に再掲する。
timezone: Asia/Tokyo

+load:
  embulk>: data/in_gcs_out_bigquery.yml.liquid

+last:
  rb>: MyNotification.notify
  require: tasks/my_notification.rb
まだまだ機能は豊富なのでWhat’s Digdag? — Digdag 0.8 documentationを通読しようと思う。
コードも綺麗なので追いやすい。
Digdagの実行
digdag run で実行できる。
$ digdag run billing_workflow.dig
2016-06-20 02:13:25 +0900: Digdag v0.8.1
2016-06-20 02:13:26 +0900 [INFO] (main): Starting a new session project id=1 workflow name=billing_workflow session_time=2016-06-19T00:00:00+00:00
2016-06-20 02:13:26 +0900 [INFO] (0018@+billing_workflow+load): embulk>: data/in_gcs_out_bigquery.yml.liquid
2016-06-20 02:13:30.123 +0900: Embulk v0.8.9
2016-06-20 02:13:31.925 +0900 [INFO] (0001:transaction): Loaded plugin embulk-input-gcs (0.2.0)
2016-06-20 02:13:35.929 +0900 [INFO] (0001:transaction): Loaded plugin embulk-output-bigquery (0.3.6)
2016-06-20 02:13:38.032 +0900 [INFO] (0001:transaction): Using local thread executor with max_threads=8 / tasks=159
2016-06-20 02:13:38.268 +0900 [INFO] (0001:transaction): embulk-output-bigquery: Create dataset... yukiyan-development:gcp_billing
2016-06-20 02:13:40.562 +0900 [INFO] (0001:transaction): embulk-output-bigquery: Create table...

...(省略)...

2016-06-20 02:14:38 +0900 [INFO] (0018@+billing_workflow+last): rb>: MyNotification.notify
Success. Task state is saved at .digdag/status/20160619T000000+0000 directory.
  * Use --session <daily | hourly | "yyyy-MM-dd[ HH:mm:ss]"> to not reuse the last session time.
  * Use --rerun, --start +NAME, or --goal +NAME argument to rerun skipped tasks.
.digdag/status/20160619T000000+0000に各ステップのステータスが記録されているようだ。
% cat .digdag/status/20160619T000000+0000/+billing_workflow*
fullName: "+billing_workflow+last"
state: "success"
result:
  subtaskConfig: {}
  exportParams: {}
  storeParams: {}
  report:
    inputs: []
    outputs: []
fullName: "+billing_workflow+load"
state: "success"
result:
  subtaskConfig: {}
  exportParams: {}
  storeParams: {}
  report:
    inputs: []
    outputs: []
fullName: "+billing_workflow"
state: "success"
result:
  subtaskConfig: {}
  exportParams: {}
  storeParams: {}
  report:
    inputs: []
    outputs: []
digdagはsessionを再利用するので短時間にもう一度実行するとskipされる。
% digdag run billing_workflow.dig
2016-06-20 02:18:46 +0900: Digdag v0.8.1
2016-06-20 02:18:47 +0900 [WARN] (main): Reusing the last session time 2016-06-19T00:00:00+00:00.
2016-06-20 02:18:47 +0900 [INFO] (main): Using session .digdag/status/20160619T000000+0000.
2016-06-20 02:18:47 +0900 [INFO] (main): Starting a new session project id=1 workflow name=billing_workflow session_time=2016-06-19T00:00:00+00:00
2016-06-20 02:18:47 +0900 [WARN] (0018@+billing_workflow+load): Skipped
2016-06-20 02:18:47 +0900 [WARN] (0018@+billing_workflow+last): Skipped
Success. Task state is saved at .digdag/status/20160619T000000+0000 directory.
  * Use --session <daily | hourly | "yyyy-MM-dd[ HH:mm:ss]"> to not reuse the last session time.
  * Use --rerun, --start +NAME, or --goal +NAME argument to rerun skipped tasks.
sessionの再利用間隔は指定できるのでドキュメントを参考にする。
取り急ぎ再実行したい場合は、-aを付ければrerunしてくれる。
Re:dashについて
以下の記事が詳しい。環境構築は数分で完了するのでドキュメントを参考にして欲しい。
- Re:dash Use Cases at iPROS
- re:dashは何が良くて、何が足りないのか - Qiita
- Rebuild: 145: Benchmarking Placebo (naoya)
- Re:dash - Make Your Company Data Driven
- Setting up Re:dash instance — Re:dash documentation
Re:dashでグラフ化
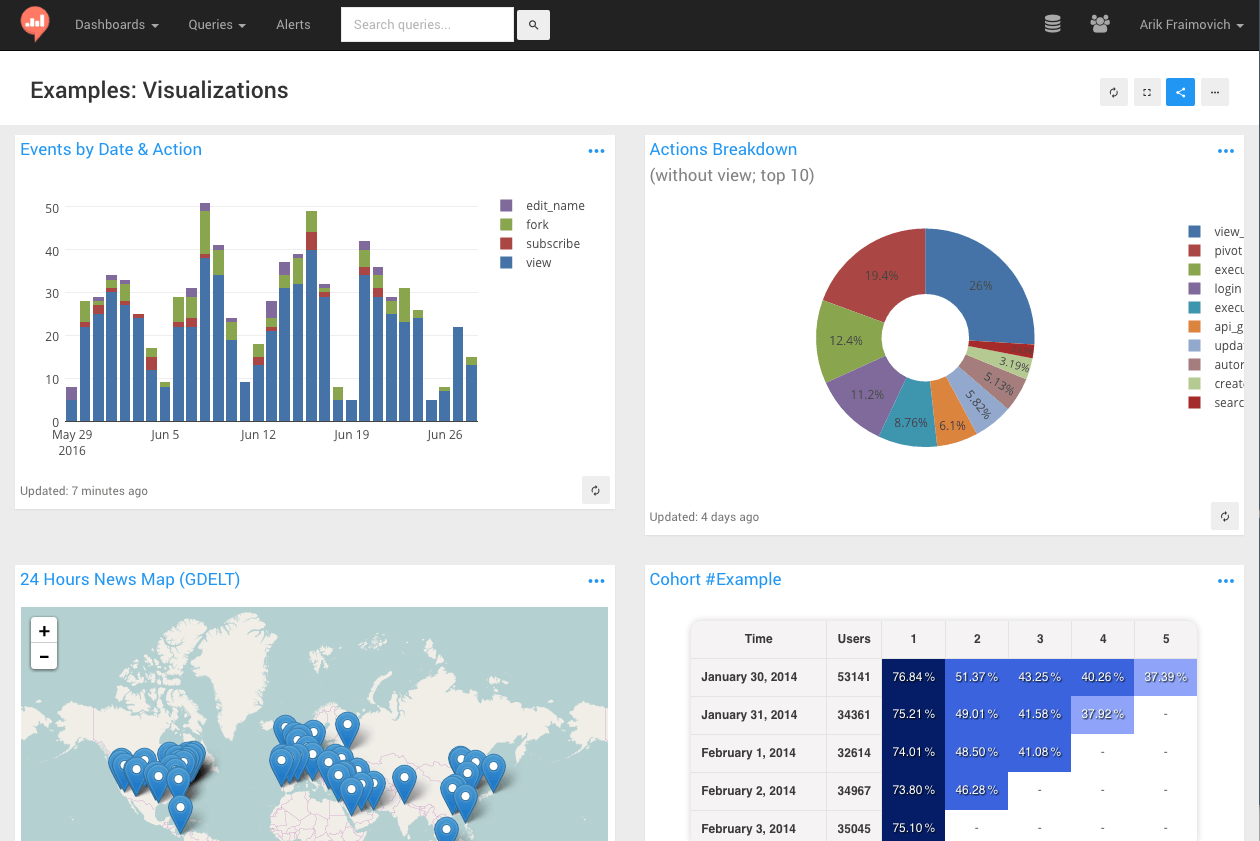
実際のものとは異なるが、イメージはこんな感じ。

実際のダッシュボード貼れないの申し訳ないのでクエリだけ貼っときます。
(注: 上手なクエリは勉強中です…)
-- 月ごとのトータルコスト
SELECT
  MONTH(Start_Time) AS month,
  SUM(FLOAT(Cost)) AS sumCost
FROM
(
  select * from
  [gcp_billing.billing_2016_06_19]
  where Project_ID = 'yukiyan-sample'
  )
GROUP BY
  month
ORDER BY
  month
-- 今月のコスト割合(カテゴリ毎)
SELECT
  LAST(SPLIT(Line_Item, '/services/')) AS Service,
  sumCost
FROM (
  SELECT
    Line_Item,
    SUM(FLOAT(Cost)) AS sumCost
  FROM
    [gcp_billing.billing_2016_06_19]
  WHERE
    MONTH(Start_Time) = MONTH(CURRENT_DATE())
    AND Project_ID = 'yukiyan-sample'
  GROUP BY
    Line_Item
  ORDER BY
    sumCost DESC)
WHERE
  sumCost != 0.0
-- 毎月のカテゴリ毎のコスト
SELECT
  Month,
  LAST(SPLIT(Line_Item, '/services/')) AS Service,
  sumCost
FROM (
  SELECT
    MONTH(Start_Time) as Month,
    Line_Item,
    SUM(FLOAT(Cost)) as sumCost
  FROM
    [gcp_billing.billing_2016_06_19]
  WHERE
    Project_ID = 'yukiyan-sample'
  AND Cost != '0'
  group by
  Month,Line_Item
)
order by Month
-- トータルコスト【先月との比較: USD】
SELECT
  MONTH(Start_Time) AS month,
  SUM(FLOAT(Cost)) AS sumCost
FROM (
  SELECT
    *
  FROM
    [gcp_billing.billing_2016_06_19]
  WHERE
    Project_ID = 'yukiyan-sample' )
GROUP BY
  month
HAVING
  month = MONTH(CURRENT_DATE())
  OR month = MONTH(CURRENT_DATE()) - 1
ORDER BY
  month
BigQueryのクエリリファレンスは以下。
Digdagでのスケジューリング
Digdagにはスケジューラが内蔵されている。
To run a workflow periodically, add a schedule: option to top-level workflow definitions.
Scheduling workflow — Digdag 0.8 documentation
個人的にはcronの記法をサポートしてるのが嬉しかった。社内のcron駆逐しやすそう 👊
cron>: CRON
Use cron format for complex scheduling
cron>: 42 4 1 * *
毎日7時に実行したい場合は以下のように書けばよい。
timezone: Asia/Tokyo

schedule:
  daily>: 07:00:00

+load:
  embulk>: data/in_gcs_out_bigquery.yml.liquid

+last:
  rb>: MyNotification.notify
  require: tasks/my_notification.rb
digdag checkで実行時間が確認できる。
% digdag check
2016-06-20 02:40:42 +0900: Digdag v0.8.1
  System default timezone: Asia/Tokyo

  Definitions (1 workflows):
    billing_workflow (3 tasks)

  Parameters:
    {}

  Schedules (1 entries):
    billing_workflow:
      daily>: "07:00:00"
      first session time: 2016-06-21 00:00:00 +0900
      first runs at: 2016-06-21 07:00:00 +0900 (28h 19m 16s later)
スケジューラの実行はうまくいかなかった【解決済: 追記あり】
digdag schedulerで実行できるはずだが、うまくいかなかった。
% digdag scheduler
2016-06-20 02:41:28 +0900: Digdag v0.8.1
error:
ログはこんな感じ。
% digdag scheduler -l trace
2016-06-20 02:42:45 +0900: Digdag v0.8.1
2016-06-20 02:42:45 +0900 [DEBUG] (main) io.digdag.core.database.DataSourceProvider: Using database URL jdbc:h2:mem:digdag-57ce90a8-b171-4076-b485-73a4d3e64c99
2016-06-20 02:42:45 +0900 [TRACE] (main) io.digdag.cli.Command: configuration file not found: null
java.nio.file.NoSuchFileException: /Users/yukiyan/.config/digdag/config
    at sun.nio.fs.UnixException.translateToIOException(UnixException.java:86)
    at sun.nio.fs.UnixException.rethrowAsIOException(UnixException.java:102)
    at sun.nio.fs.UnixException.rethrowAsIOException(UnixException.java:107)
    at sun.nio.fs.UnixFileSystemProvider.newByteChannel(UnixFileSystemProvider.java:214)
    at java.nio.file.Files.newByteChannel(Files.java:361)
    at java.nio.file.Files.newByteChannel(Files.java:407)
    at java.nio.file.spi.FileSystemProvider.newInputStream(FileSystemProvider.java:384)
    at java.nio.file.Files.newInputStream(Files.java:152)
    at io.digdag.core.config.PropertyUtils.loadFile(PropertyUtils.java:25)
    at io.digdag.cli.Command.loadSystemProperties(Command.java:67)
    at io.digdag.cli.Sched.sched(Sched.java:101)
    at io.digdag.cli.Sched.main(Sched.java:62)
    at io.digdag.cli.Main.cli(Main.java:139)
    at io.digdag.cli.Main.main(Main.java:65)
2016-06-20 02:42:46 +0900 [TRACE] (main) io.digdag.cli.Command: configuration file not found: null
java.nio.file.NoSuchFileException: /Users/yukiyan/.config/digdag/config
    at sun.nio.fs.UnixException.translateToIOException(UnixException.java:86)
    at sun.nio.fs.UnixException.rethrowAsIOException(UnixException.java:102)
    at sun.nio.fs.UnixException.rethrowAsIOException(UnixException.java:107)
    at sun.nio.fs.UnixFileSystemProvider.newByteChannel(UnixFileSystemProvider.java:214)
    at java.nio.file.Files.newByteChannel(Files.java:361)
    at java.nio.file.Files.newByteChannel(Files.java:407)
    at java.nio.file.spi.FileSystemProvider.newInputStream(FileSystemProvider.java:384)
    at java.nio.file.Files.newInputStream(Files.java:152)
    at io.digdag.core.config.PropertyUtils.loadFile(PropertyUtils.java:25)
    at io.digdag.cli.Command.loadSystemProperties(Command.java:67)
    at io.digdag.cli.Server.buildServerProperties(Server.java:125)
    at io.digdag.cli.Sched.sched(Sched.java:103)
    at io.digdag.cli.Sched.main(Sched.java:62)
    at io.digdag.cli.Main.cli(Main.java:139)
    at io.digdag.cli.Main.main(Main.java:65)
error:
java.lang.NullPointerException
    at java.util.Hashtable.put(Hashtable.java:459)
    at java.util.Properties.setProperty(Properties.java:166)
    at io.digdag.cli.Sched.sched(Sched.java:104)
    at io.digdag.cli.Sched.main(Sched.java:62)
    at io.digdag.cli.Main.cli(Main.java:139)
    at io.digdag.cli.Main.main(Main.java:65)
.config/digdag/configを読みにいってるが、失敗している。たしかにそのようなファイルは作っていない。
ドキュメントを読んでみた。
-c, –config PATH
Server configuration property path. This is same with server command. See Digdag server for details.
Example: -c digdag.properties
Command reference — Digdag 0.8 documentation
Digdag server のリンクが切れていた。
コード読めばきっとわかると思うので、digdag.propertiesにどんな内容を書けばいいのかは今後調べる。
ちょっと残念だが(あとで絶対調べる)、あとは様々なクエリを書いて分析・可視化を繰り返していくだけなので、最低限のことはできたと思う。
追記(2016/06/20 8:15)
digdag scheduler だけではダメで、digdag sceduler --project .で動きました!
@hiroysatoさんからご指摘をいただきました 🙏
ありがとうございます! 助かりました!
まとめ
他のワークフローエンジンを使ったことが無いので、月並みな感想しか言えないが、Digdagは割りと簡単に使えたし、便利だった。
データのローディングはembulkが本当に使いやすい。バルクロード中のログを眺めるのが好き。
分析基盤構築時に限らないが、データ処理ワークフローというものは往々にして複雑になり、ジョブ間の依存関係がどうしても出てしまうものだが、Digdagの設定ファイルは頭に浮かんだワークフローを設定ファイルに落とし込みやすいし直感的だし機能も豊富なのでとても期待のできるものだった。
分析対象が、リアルタイム性を重視するものだと、fluentdも使う必要があると思う。そうすると、fluentd + embulk + DigdogというTreasure Dataの御三家すべてにお世話になる。すごい!
Re:dashについては、UI的な話だが、Re:dash上のクエリ入力画面であくせく作業するより、BigQueryのWebUI(最近見やすくなった)で試行錯誤して分析用クエリ文を作成し、完成したらRe:dash上にコピペして、Re:dash上では主にグラフ化やダッシュボード作成に専念するのがやりやすかった。
なので、営業や経営層に開放する場合は、BigQueryのREAD ONLY権限も与えることも検討したほうが良さそう。
特に難しくないので、SQLさえ書ければ基本的な機能は使いこなせるはず 🍣
標準SQLもサポートし始めたので、BigQuery特有の構文に悩まされることも少なくなりそう。
- クエリ リファレンス | BigQuery | Google Cloud Platform
- BigQuery 1.11, now with Standard SQL, IAM, and partitioned tables! | Google Cloud Big Data and Machine Learning Blog | Google Cloud Platform
Re:dashでは、コホートやヒートマップ、ピボットテーブルも作成できるが、私の統計学の知識が不足していてどんなクエリを書けばいいのか思いつかなかった。
あと今回の記事には書いてないが、Re:dashでは他にもGoogleスプレッドシートをデータソースにできたりアラートも設定できたりクエリに変数を埋め込んで動的な内容にできるので素晴らしい。
今回は、GCPのコストをターゲットにしたが、とにかくなんでもBigQuery(又はその他データウェアハウス)に突っ込んでしまえばどうとでもなるので、財務データやSFDCのデータ、Webアプリケーションログも同じように分析できそうな気がする。
とはいえ、Digdagについてはまだまだ調査不足で、説明も全体的に雑になってしまって申し訳ないが、今後もっと調べて記事を書こうと思う。
参考になるツイート
Digdag、まずはEmbulkによるETL処理の自動化に最適。複数のデータソースから並列または直列にデータロード→日付ごとにテーブル作成→一次集計とJOIN…という処理を直感的に記述できる。 #digdag pic.twitter.com/IDEV2eVbjZ
— Sadayuki Furuhashi (@frsyuki) 2016年6月15日
パラメータ化が可能。引数やファイルから受け取ったパラメータを、設定ファイルや引数に埋め込んでからコマンドを実行できる。同じような処理を同じテーブルや同じデータソースに対して適用したい場合に効果的。 #digdag
— Sadayuki Furuhashi (@frsyuki) 2016年6月15日
for_each> や if> などのフロー制御ができ、プログラマブルなワークフローを組み立てられる。外部のスクリプトを呼んでパラメータをとってきて、その値に応じて次のアクションを変えたり、ループさせたりできる。https://t.co/Y7v21U3Sek #digdag
— Sadayuki Furuhashi (@frsyuki) 2016年6月15日
Dockerイメージを指定してタスクを実行できる、スケジューラ内蔵なのでcronがいらない、分散実行に対応、実行時間超過/失敗時のエラー通知、etc etc。今ワークフローエンジンをちゃんと作るとこうなるよね、という機能がほぼあるはず。 #digdag
— Sadayuki Furuhashi (@frsyuki) 2016年6月15日
正直なところ、コードはEmbulkより良くできているので、メンテナンスが楽そう…チームメンバーも2人いるし。 #digdag
— Sadayuki Furuhashi (@frsyuki) 2016年6月15日